Venango County Web Mapping Help
The Venango County web
mapping interface has been designed to provide you with a simple and intuitive
web mapping experience that is modeled after popular consumer based web mapping
applications. This includes a buttonless interface, seamless panning,
scroll-wheel zooming and intuitive search and mark-up tools.
|
The Venango
County Web Mapping Application page has four main parts:
|
|
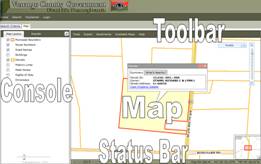
To switch between the Map
Layers and Results, click on the tab with the name of the function you want to
access. You can resize the console area by the divider between the Console and
the Map. This allows more room to view either area as you work.
You can use a mouse to
perform nearly all navigation functions on the map:
|
Map action |
Use this tool... |
...and do this |
|
Re-center
the map And
view the current
extent |
||
|
Left
mouse |
Click on the left mouse button and drag the map to the new
location |
|
|
Overview
map
|
The red rectangle shows the current map extent. |
|
|
Zoom
in |
Mouse
wheel |
Scroll the mouse wheel forward or up to zoom in. Each
wheel click will zoom the map by about 50 percent in width and height. |
|
Shift
+ Left mouse |
Hold the Shift key down, then hold the left mouse button
down and drag on the map to draw a rectangle. The map will zoom to the area
of the rectangle. |
|
|
Double-click
|
Double-click
on the mouse to zoom in by about 50 percent in width and height. |
|
|
Zoom
Bar
|
Drag pointer up or click |
|
|
Zoom
out |
Mouse
wheel |
Scroll the mouse wheel backward or down to zoom out. Each
wheel click will zoom the map by about 50 percent in width and height. |
|
Zoom
Bar
|
Drag pointer down or click |
|
|
Identify
features |
Left
mouse |
Single-click on the map feature you want to identify. |
|
Go
Back an
Extent |
|
Click on the right keyboard arrow to go forward one map
extent. |
|
Go
Forward an
Extent |
|
Click on the left keyboard arrow to go back one map
extent. |

Some tools, such as the Measure window
and the Identify window,
may be moved around the page. You can arrange these elements to suit your own
work. To move tools, click and hold with the left mouse button on the title bar
of the element. As you hover over the element's title bar, the cursor changes
to a four-way arrow, indicating you can move it by clicking and dragging. To
minimize the tool on the interface without closing it, click on the two arrows
in the upper-right hand corner of the tool.

Drag the element to the position you want and release the mouse button. If you
accidentally move an element outside the visible window, you may move it back
by using the browser's scrollbars to scroll the window until the element is
visible and drag it back to the main area of the window. Close a tool by
clicking the close button it its upper right corner. All windows can be
re-opened by click on the tool name in the toolbar.
You can continue to navigate
on the map – zoom, pan, and change the extent of the map – while
using any of the tools. This means that you can measure, markup, print, and
user other tools and still change your current extent on the map.
Tools
Identify: The Identify tool
can be used to view attributes about map features by clicking on the map or
clicking the Buffer, Polygon or Point buttons in the Identify tool window and
drawing a sketch on the map. When
using the Polygon tool, each click on the map will place a vertex (corner) and
allow users to define the shape of the area. The following functionality is
available in the Identify tool:
·
Users
can pan and zoom on the map while they are using the identify tool.
·
The
results of the identify query are displayed in the Results tab of the Console
panel. They are organized by layer with a listing of the number of results
returned. Click the layer name to expand the listing of individual features
identified and to see a summary of information stored in the database about each
feature. Hovering the cursor over the feature in the results list will cause
feature to be highlighted on the map.
·
The
sketch may be modified by adding, moving, and deleting vertices. Click on and
drag a shaded vertex box to move it. Click a hollow vertex box to create and
place a new vertex. To delete a vertex, place the pointer over a shaded vertex
box and press the Esc key.
·
To
delete the current sketch, users can start creating a new sketch, close the
Measure tool window, or switch to a different tool.
Using Results:
Once features have been identified on the map, you can investigate the results
using the results tab on the Console. The layer name and number of returning
records will be provided.
·
Click
on the layer name to open the records.
·
Click
on “more info…” to view detailed attributes for the record.
·
To
view additional results, click on the arrows at the bottom of the results to
show more results or to return more results per page.
·
To
highlight records, check the highlight checkbox.
·
To
zoom to records, click on the zoom button, displayed as a magnifying glass.
·
To
export records, click on the Excel button in the top right portion of the
panel.
·
To
sort records by a field, choose a field from the Sort By drop-down list.
Measure: The measure tool can be used to
measure user defined distances and areas in the map panel by clicking on the
measure tool. The following functionality is available in the Measure tool. To
measure linear distances, click on the map to start sketching a line. To
measure an area, click on the Draw Shape button in the Measure tool window and
start sketching.
·
Each
click on the map will place a vertex and allow the user to change the
line’s direction. Upon placement of the second vertex and with each
subsequent vertex placed, the measurement value will be updated in the lower
portion of the Measure tool window.
·
While
creating the sketch, pressing the Delete key will delete the last vertex
placed.
·
Double
click to finish the sketch. The final sketch measurement totals will appear in
the lower portion of the Measure tool window.
·
The
sketch may be modified by adding, moving, and deleting vertices. Click on and
drag a shaded vertex box to move it. Click a hollow vertex box to create and
place a new vertex.
·
Perimeter
and Area units can be changed dynamically by changing the units in the dropdown
lists beside the measurement values.
·
To
delete the current sketch, either start creating a new sketch, close the
Measure tool window, or switch to a different tool.
·
Users
can pan and zoom on the map while they are using the measure tools.
MarkUp:
The Markup tool is used to create geographically referenced and/or
feature-linked graphics and text which can be displayed on the map at varying
scales. To use the tool, select from polygonal, linear, circular and text markup
types. You can control markup outline / fill color and transparency, line width
as well as modify graphics and text after it is created. By default, the
application provides a name using the shape type chosen by the end user but you
can rename the mark up and click on the Save button to save it in your current
map session.
ZoomTo XY: The Zoom to Latitude / Longitude tool
is used to jump to a specific map location based on a known set of map
coordinates. Users will click on the Zoom to Latitude/Longitude tool and enter
the coordinate values as Degrees, Minutes, Seconds in the appropriate boxes and
indicate the hemispheres. Clicking the Go To button will re-center the map on
that location
Export:
The Export / Print tool
generates a printable export of the current map. Click on the Export/Print
button on the toolbar, choose the map format. Image formats will be provided as
a simple image in a new browser pop-up window, that can then be exported by
right-clicking on the Image and choosing the Save As… option. If you
choose not to scale the image to fit to the current map window, the software
will show an “Export Area” on the map.
Bookmarks: The Bookmark tool allows you to quickly zoom to specific
locations on the map. Click on the named bookmark that you want to use and the
map will zoom to that bookmark extent.
Available Maps: Depending
on your security access on the application, more than one map may be available
to use. To access other maps on the application, choose a map service from the
list of available maps. This will reset your map session so that any active
tools will be reset as well, including map markups. The layers, bookmarks, and
other content of the map may change significantly from one map to another.
More Information
System Requirements: The County web
mapping application is designed to work with all modern web browsers but is optimized
for Internet Explorer 6+ and Firefox 1.5+.
Troubleshooting: If you receive a message that the session has timed out from extended inactivity, then a new session must be started to use this application by closing this browser and reopening. The application will time out if you do not interact with it for some time (20 minutes by default). To continue, either close and reopen the browser at this application, or completely refresh the browser window. Pressing the Ctrl key while also pressing the F5 key will refresh most browsers. Or, click in the address bar and click Go or press Enter. This will reload the site. Any changes you had made and any unsaved edits, if applicable, will be lost.